Configure Google Workspace with Black Pearl Mail
These steps will route all of your users through the Black Pearl Mail platform. If you prefer to start with a test/pilot group before rolling out with all of your users, follow these instructions.
 To carry out the following steps, you will require a Google Workspace account with global administrator permissions.
STEP 1 – Login and go to Gmail Settings
1) Go to your Gmail Administrator settings: http://admin.google.com/.
2) From the left-hand menu, select Apps > Google Workspace > Gmail.
STEP 2 – Set up a New Mail Route
1) Click the Hosts.
2) Click the Add Route.
In the popup, enter the following:
- Name: Black Pearl Mail
- Ensure that the Specified email server is set to single host.
- Hostname (case sensitive): smtp-global.blackpearlmail.com
- Port number: 25
- Ensure Require secure transport (TLS) is checked.
- Ensure Require CA signed certificate is checked.
- Ensure Validate certificate hostname is checked.
3) Click Test TLS connection and ensure it passes.
4) Click Save.
STEP 3 – Setting up SMTP Relay Rules
1) Go Back to Settings for Gmail.
2) Scroll to the bottom of the page and click Routing.
3) Scroll down to the SMTP relay service.
4) Click on Configure or Add another rule.

5) Enter the following:
- Enter the description as Black Pearl Relay.
- Change allowed senders to Only addresses in my domain.
- Check Only accept mail from the specified IP addresses.
Add the following IP ranges:
- Black Pearl West US - 13.86.181.222
- Black Pearl East 1 US - 13.86.126.189
- Black Pearl East 2 US - 40.88.53.55
All other fields can be left blank.
6) Click Save.
STEP 4 – Configure Compliance Settings
1) Go back to Settings for Gmail.
2) Scroll down to the bottom of the page and select Compliance.
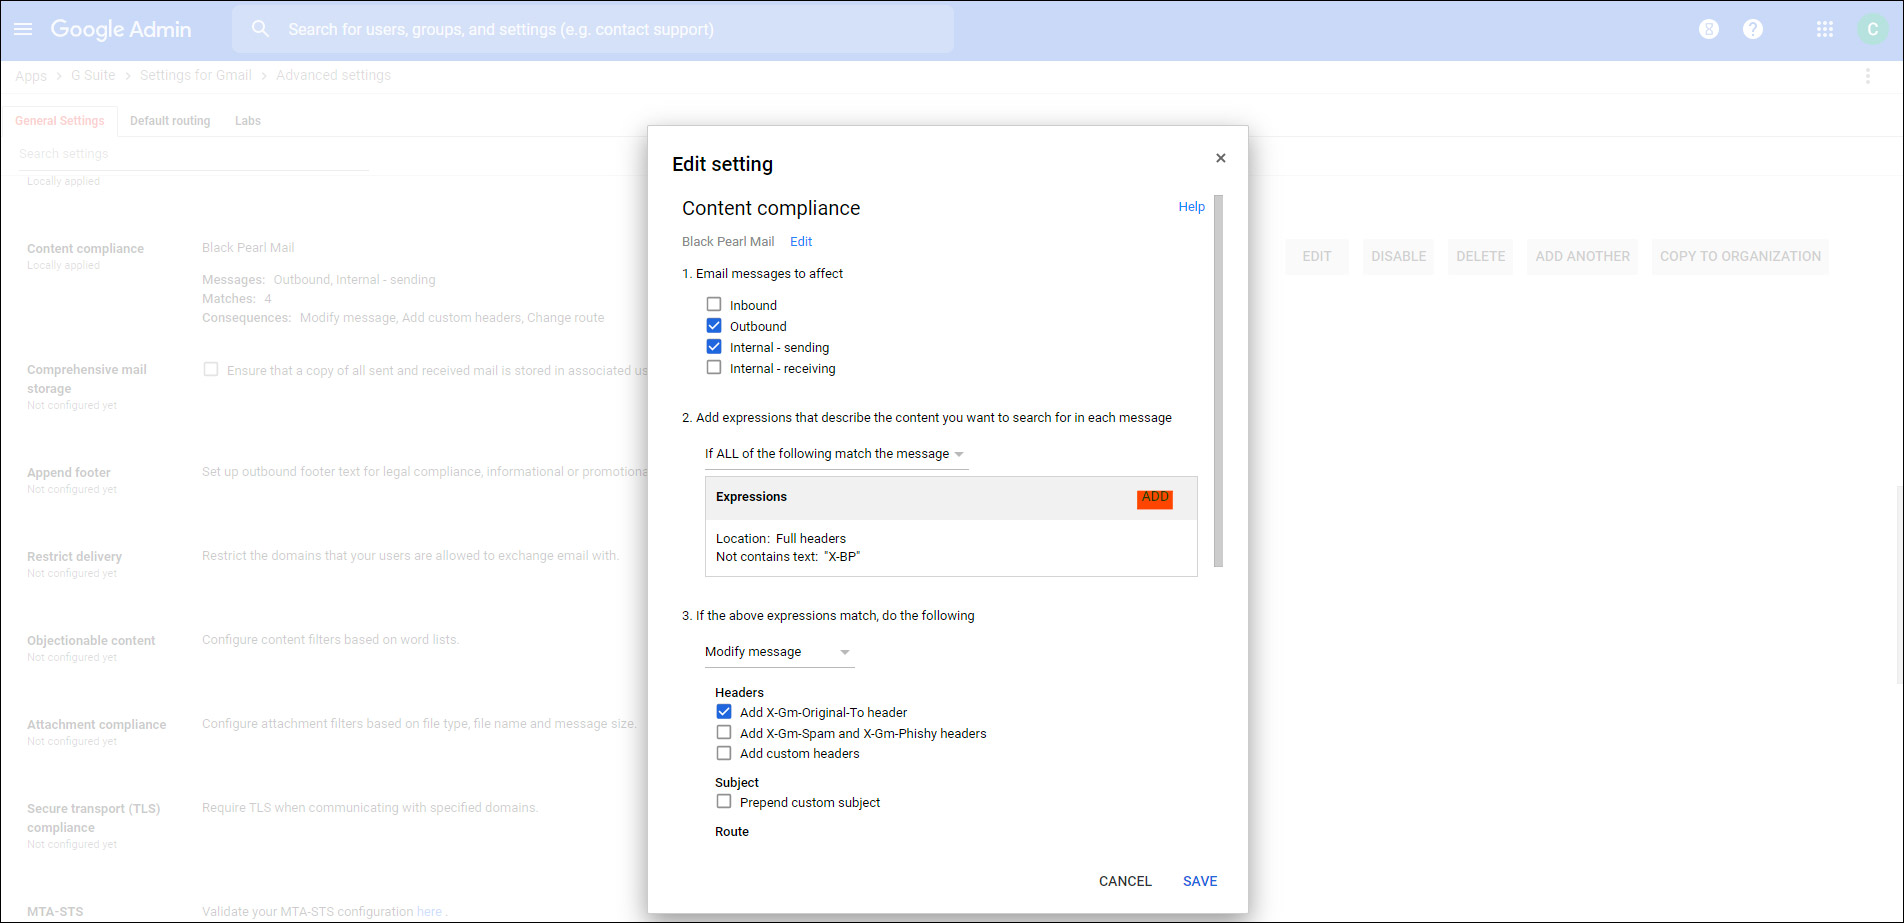
2) Scroll down to Content Compliance and click Configure or Add another rule.
4) Set the description to Black Pearl Compliance.
- Under 1. Email messages to affect check Outbound and Internal Sending.
- Under 2. Add expressions that describe the content you want to search for in each message, make sure that you have If ALL of the following match the message selected in the drop-down, then:
- Choose to add an expression.
- Select Advanced content match.
- Location should be set to Full headers.
- Match type set to not contains text.
- Enter X-BP to Content and Save the expression.
- Click Save.
5) Click Add to add another expression.
- Select Advanced content match.
- Select Location to Headers + Body.
- Select Match type to Not contains text.
- Enter BEGIN:VCALENDAR into the Content area.
- Click Save.
6) Click Add to add another expression.
- Select Advanced content match.
- Select Location to Envelope Sender.
- Select Match type to Not contains text.
- Enter google.com into the Content area.
- Click Save.
7) Click Add to add another expression.

- Select Advanced content match.
- Select Location to Full headers.
- Select Match type to Not matches regex.
- Enter (\W|^)(From:)*(<calendar-notification@google\.com>)(\W|$) into the Regex area.
- Click Test expression and then select Save.
8) Scroll to If the above expressions match do the following.
- Under Headers - Check “Add X-GM-Original-To header”.
- Under Route - Check “Change Route”.
- Select Black Pearl Mail from the dropdown.
9) Click Save.
That completes the settings needed in Google Workspace. You are now configured to route with Black Pearl Mail. These settings can take up to an hour to complete.
Next, you'll want to create signature templates, add user details, and lastly turn on signatures for your users. We have great Getting Started articles that you can reference below.
Related Articles
Configure Microsoft 365 with Black Pearl Mail
These steps will route all of your users through the Black Pearl Mail platform. If you would prefer to start with a test/pilot group before rolling out with all of your users, follow these instructions. The following steps will need to be done within ...Configure Google Workspace with Black Pearl Mail - Using a Test/Pilot Organizational Unit (OU)
You may want to set up a specific group of users to test the Black Pearl Mail system before deploying to your entire organization. This article explains how to create a test organizational unit (OU) in Google Workspace. If you'd prefer to set up your ...Configure Google Workspace for Black Pearl Mail Within an Existing OU for a Single User
If you have existing OU's within Google Workspace, and you only want to restrict certain users within an OU to route through Black Pearl Mail, then then please follow the steps within this article. STEP 1 – Login and go to Gmail Settings 1) Go to ...Configure Google Workspace with Black Pearl Mail (new content compliance config)
These steps will route all of your users through the Black Pearl Mail platform. If you prefer to start with a test/pilot group before rolling it out with all of your users, follow these instructions. To carry out the following steps, you will require ...Configure Black Pearl Mail routing for users based on group membership for Google Workspace
These steps will route users through the Black Pearl Mail platform who are members of a specified group. To carry out the following steps, you will require a Google Workspace account with global administrator permissions. STEP 1 – Create a Group 1) ...