How to Edit an Audience Filter in Pearl Diver
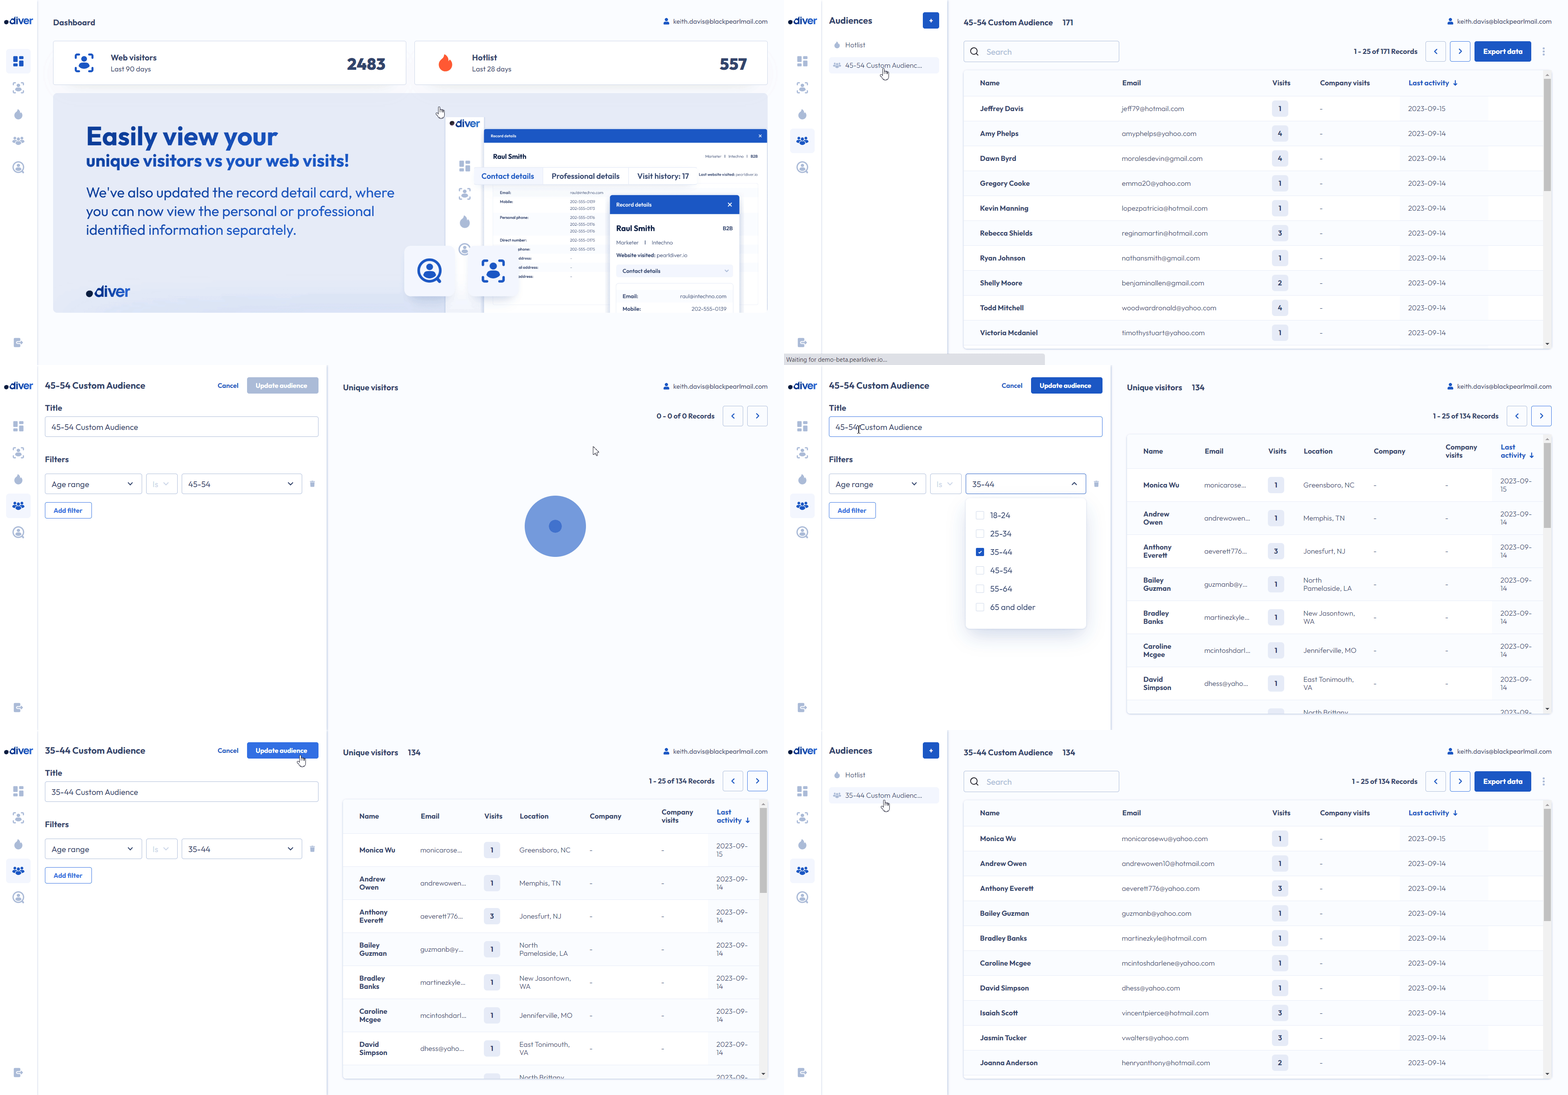
To make changes to an existing Audience in our platform, follow these steps:
Navigate to the Audience:
Start by logging in to your account and accessing the platform dashboard.
On the left-hand side menu, you'll find the list of Audiences.
Click on the Audience you want to edit.
Access the Edit Options:
Once you've selected the Audience, look for the options icon (⋮) located next to the 'Export Data' button.
Click on this icon to open a dropdown menu.
From the dropdown menu, select the 'Edit' option. This will open the Audience editing interface.
Make your Changes:
The 'Title' field will be pre-populated with the current Audience title. You can modify it if needed, but make sure it remains unique.
The filter inputs will also be pre-populated with the current settings. You can modify these as required, following the same guidelines as when creating an Audience.
There are three input fields: identifier, operator, and value(s).
- Identifier: This is the attribute or characteristic you want to target. For example, "Age," "Industry," or "Visit Count."
- Operator: Describe the relationship or condition for the chosen identifier. You can select options like "Is," "Greater Than," or "Less Than."
- Value(s): Input the specific details or data points relevant to the identifier. For instance, "25-34" for Age, "Sales and Marketing" for Industry, or "5" for Visit Count.
You can add up to 5 filters. Remember, you cannot select the same identifier twice, and each filter set must be completed before adding another.
Click 'Add filter' after completing each row to add more filters.
To remove a filter, click on the 'Trash' icon next to the filter row.
Review Changes to Your Audience:
On the right sidebar, you'll see a table displaying the Name, Email, and Last activity date of the website visitors that match your updated filter criteria.
Note: Sorting, searching, and exporting a CSV file are disabled while editing the Audience.
Finalize and Save Changes:
Once you've made the desired changes, click the 'Edit audience' button to save your modifications.
If the form is incomplete or invalid, the 'Edit audience' button will be disabled. Ensure all required fields are filled in.
If you decide to cancel or discard your changes at any point, simply click 'Cancel.'
That's it! You've successfully updated your audience. Now you can use this audience for targeted communications and campaigns tailored to their specific characteristics and behaviors.
See below a quick Gif of the overall process!
Related Articles
How to Delete an Audience Filter in Pearl Diver
To make changes to an existing Audience in our platform, follow these steps: You can not delete the default hotlist Navigate to the Audience: Start by logging in to your account and accessing the platform dashboard. On the left-hand side menu, you'll ...How to Create and Use/Export an Audience Filter in Pearl Diver
Creating an audience is a fundamental step in effectively managing and targeting your contacts. With our simple step-by-step guide, you'll be able to create audiences tailored to your specific needs in no time, and use these effectively. CLICK HERE ...Configure your Salesforce Integration with Pearl Diver
By integrating Pearl Diver with Salesforce, businesses can leverage Pearl Diver’s lead intelligence to automatically enrich Salesforce contact profiles with detailed data insights. This allows sales and marketing teams to better segment their leads, ...Configure your Klaviyo Integration with Pearl Diver
By integrating Pearl Diver with Klaviyo, businesses can leverage Pearl Diver's lead intelligence to automatically segment and target high-value prospects. This enables them to run highly personalized email marketing campaigns and retarget visitors ...SEPTEMBER UPDATE - What's New with Pearl Diver?
We are excited to announce new Pearl Diver updates! Prepare for an enhanced user interface and a solid foundation for exciting upcoming features, all designed to elevate your Pearl Diver experience. Get ready to dive into a whole new world of ...